纸上得来终觉浅,绝知此事要躬行。

0%

iOS 私有库模块产物化及托管服务器

目的

为减少编译时间和打包时间,将私有库模块预编译成framework包引入工程,并使用脚本实现模块自动升级、和产物化托管。

一、模块生成framework包

使用打包工具cocoapods-packager ,具体下载方法和使用方法点击链接可查看。

为了先保证打包成功之后,才更新版本到私有库,使用本地代码仓库进行打包。将打包所用podspec需要与私有库podspec区分开。

以EMPAppstore模块举例:私有库podspec:EMPAppStore.podspec;打包所需podspec:EMPAppStorePackage.podspec

EMPAppStorePackage.podspec内容:

1
2
3
4
5
6
7
8
9
10
11
12
13
14
15
16
17
18
19
20
21
22
23
24
25
26
27
28
29
30
31
32
33
34
35
36
37
38
39
40
41
42
43
44
45
46
require 'etc'

Pod::Spec.new do |s|

s.name = "EMPAppStore"
s.version = "2.0.11"
s.summary = "EMPAppStore !!"
s.description = <<-DESC
EMPAppStore 通讯录模块!

DESC
s.homepage = "**"
s.license = "MIT"
s.author = { "**" }
s.platform = :ios, "8.0"
s.source = { :git => "/Users/#{Etc.getlogin}/.jenkins/workspace/EMPAppStore" }
s.resources = 'EMPAppStore/Resources/*.bundle'
s.frameworks = 'UIKit', 'Foundation'
s.requires_arc = true

s.source_files = 'EMPAppStore/Core/**/*.{h,m}'
s.prefix_header_file = 'EMPAppStore/Core/EMPAppStorePCH.pch'
s.module_name = 'EMPAppStore'
#s.static_framework = true

s.dependency 'MJExtension', '~> 3.0.13'
s.dependency 'Realm', '~> 2.6.2'
s.dependency 'SVProgressHUD', '~> 2.1.2'
s.dependency 'SDWebImage', '~> 4.0.0'
s.dependency 'LPActionSheet', '~> 1.0'
s.dependency 'SSZipArchive', '~> 2.0.3'
s.dependency 'UAProgressView', '~> 0.1.3'

s.dependency 'EMPHttpClient'
s.dependency 'EMPUtils'
s.dependency 'EMPAppService'
s.dependency 'EMPKit'

s.pod_target_xcconfig = { 'EXCLUDED_ARCHS[sdk=iphonesimulator*]' => 'arm64' }
s.user_target_xcconfig = { 'EXCLUDED_ARCHS[sdk=iphonesimulator*]' => 'arm64' }

s.pod_target_xcconfig = { 'CLANG_ALLOW_NON_MODULAR_INCLUDES_IN_FRAMEWORK_MODULES' => 'YES' }
s.user_target_xcconfig = { 'CLANG_ALLOW_NON_MODULAR_INCLUDES_IN_FRAMEWORK_MODULES' => 'YES' }

end

打包脚本package.h内容

1
pod package EMPAppStorePackage.podspec --force --embedded --no-mangle --exclude-deps --spec-sources=[私有库repo地址],https://github.com/CocoaPods/Specs.git
错误及解决方法
1
have the same architectures (arm64) and can't be in the same fat output file

原因:XCode12 编译的模拟器库新增支持架构arm64,和真机模拟器的arm64格式冲突。

解决方法:

  1. 在packagePodspec中增加target的配置:
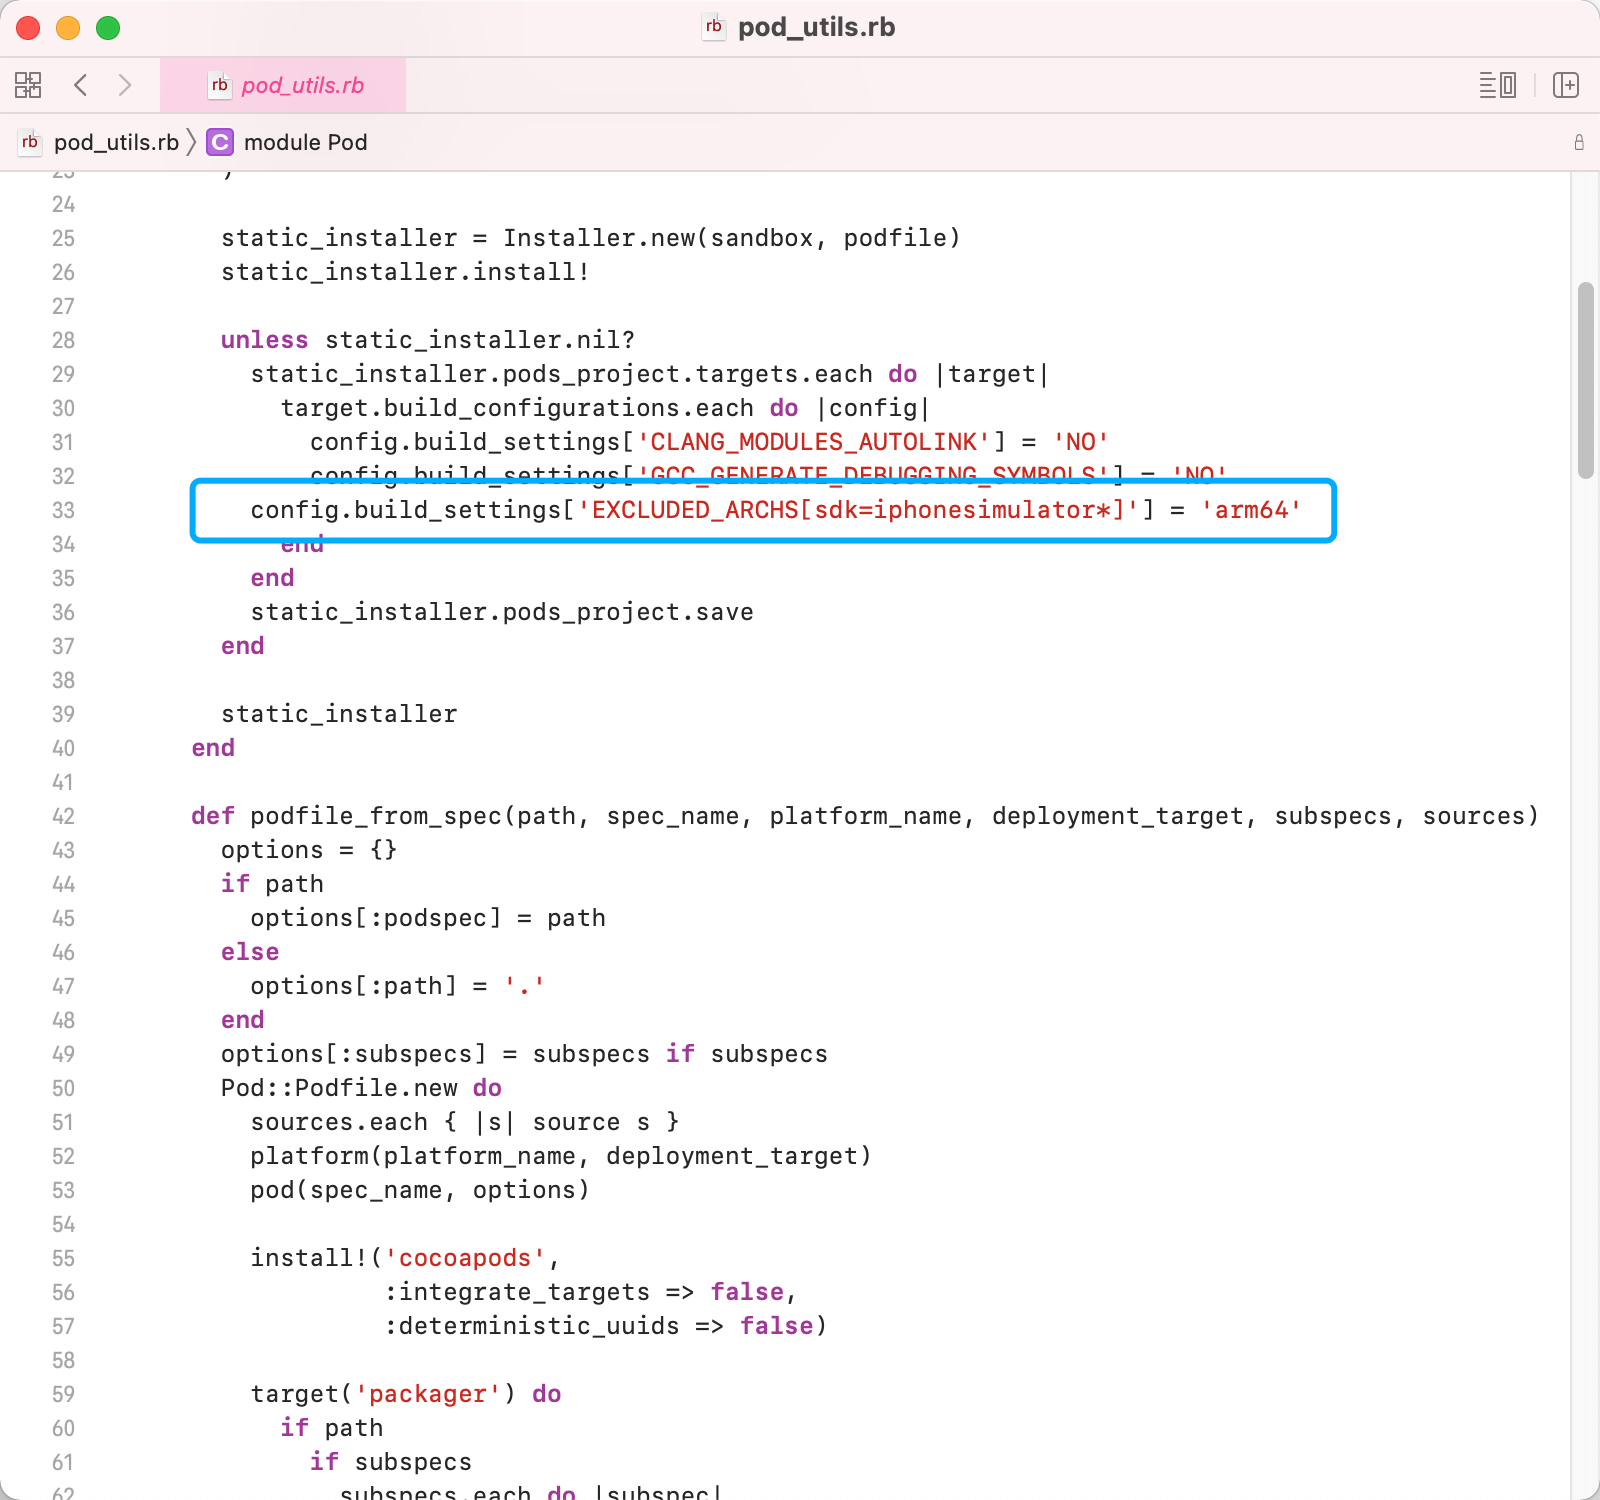
1
2
s.pod_target_xcconfig = { 'EXCLUDED_ARCHS[sdk=iphonesimulator*]' => 'arm64' }
s.user_target_xcconfig = { 'EXCLUDED_ARCHS[sdk=iphonesimulator*]' => 'arm64' }

仍然出现错误的话

  1. 修改cocoapods-packager的源码:

源码路径(注意gem版本和cocoapods-packager版本):

/Library/Ruby/Gems/2.6.0/gems/cocoapods-packager-1.5.0/lib/cocoapods-packager/

修改pod_utils.rb文件 添加一行

修改后的pod_utils.rb文件

二、模块产物化的托管

两种方案

  1. 生成的framework包直接放在源码仓库中

    问题:每次更新一个版本都会在源码仓库中增加一个framework包,导致源码仓库占用内存随版本更新不断增大,会导致两个问题:

    • 长此以往,gitee上仓库硬盘容量不足
    • 浪费组内成员更新仓库所需的时间
  2. 既然cocoapods支持zip包的下载方式。干脆把framework包压缩后托管在服务器上。

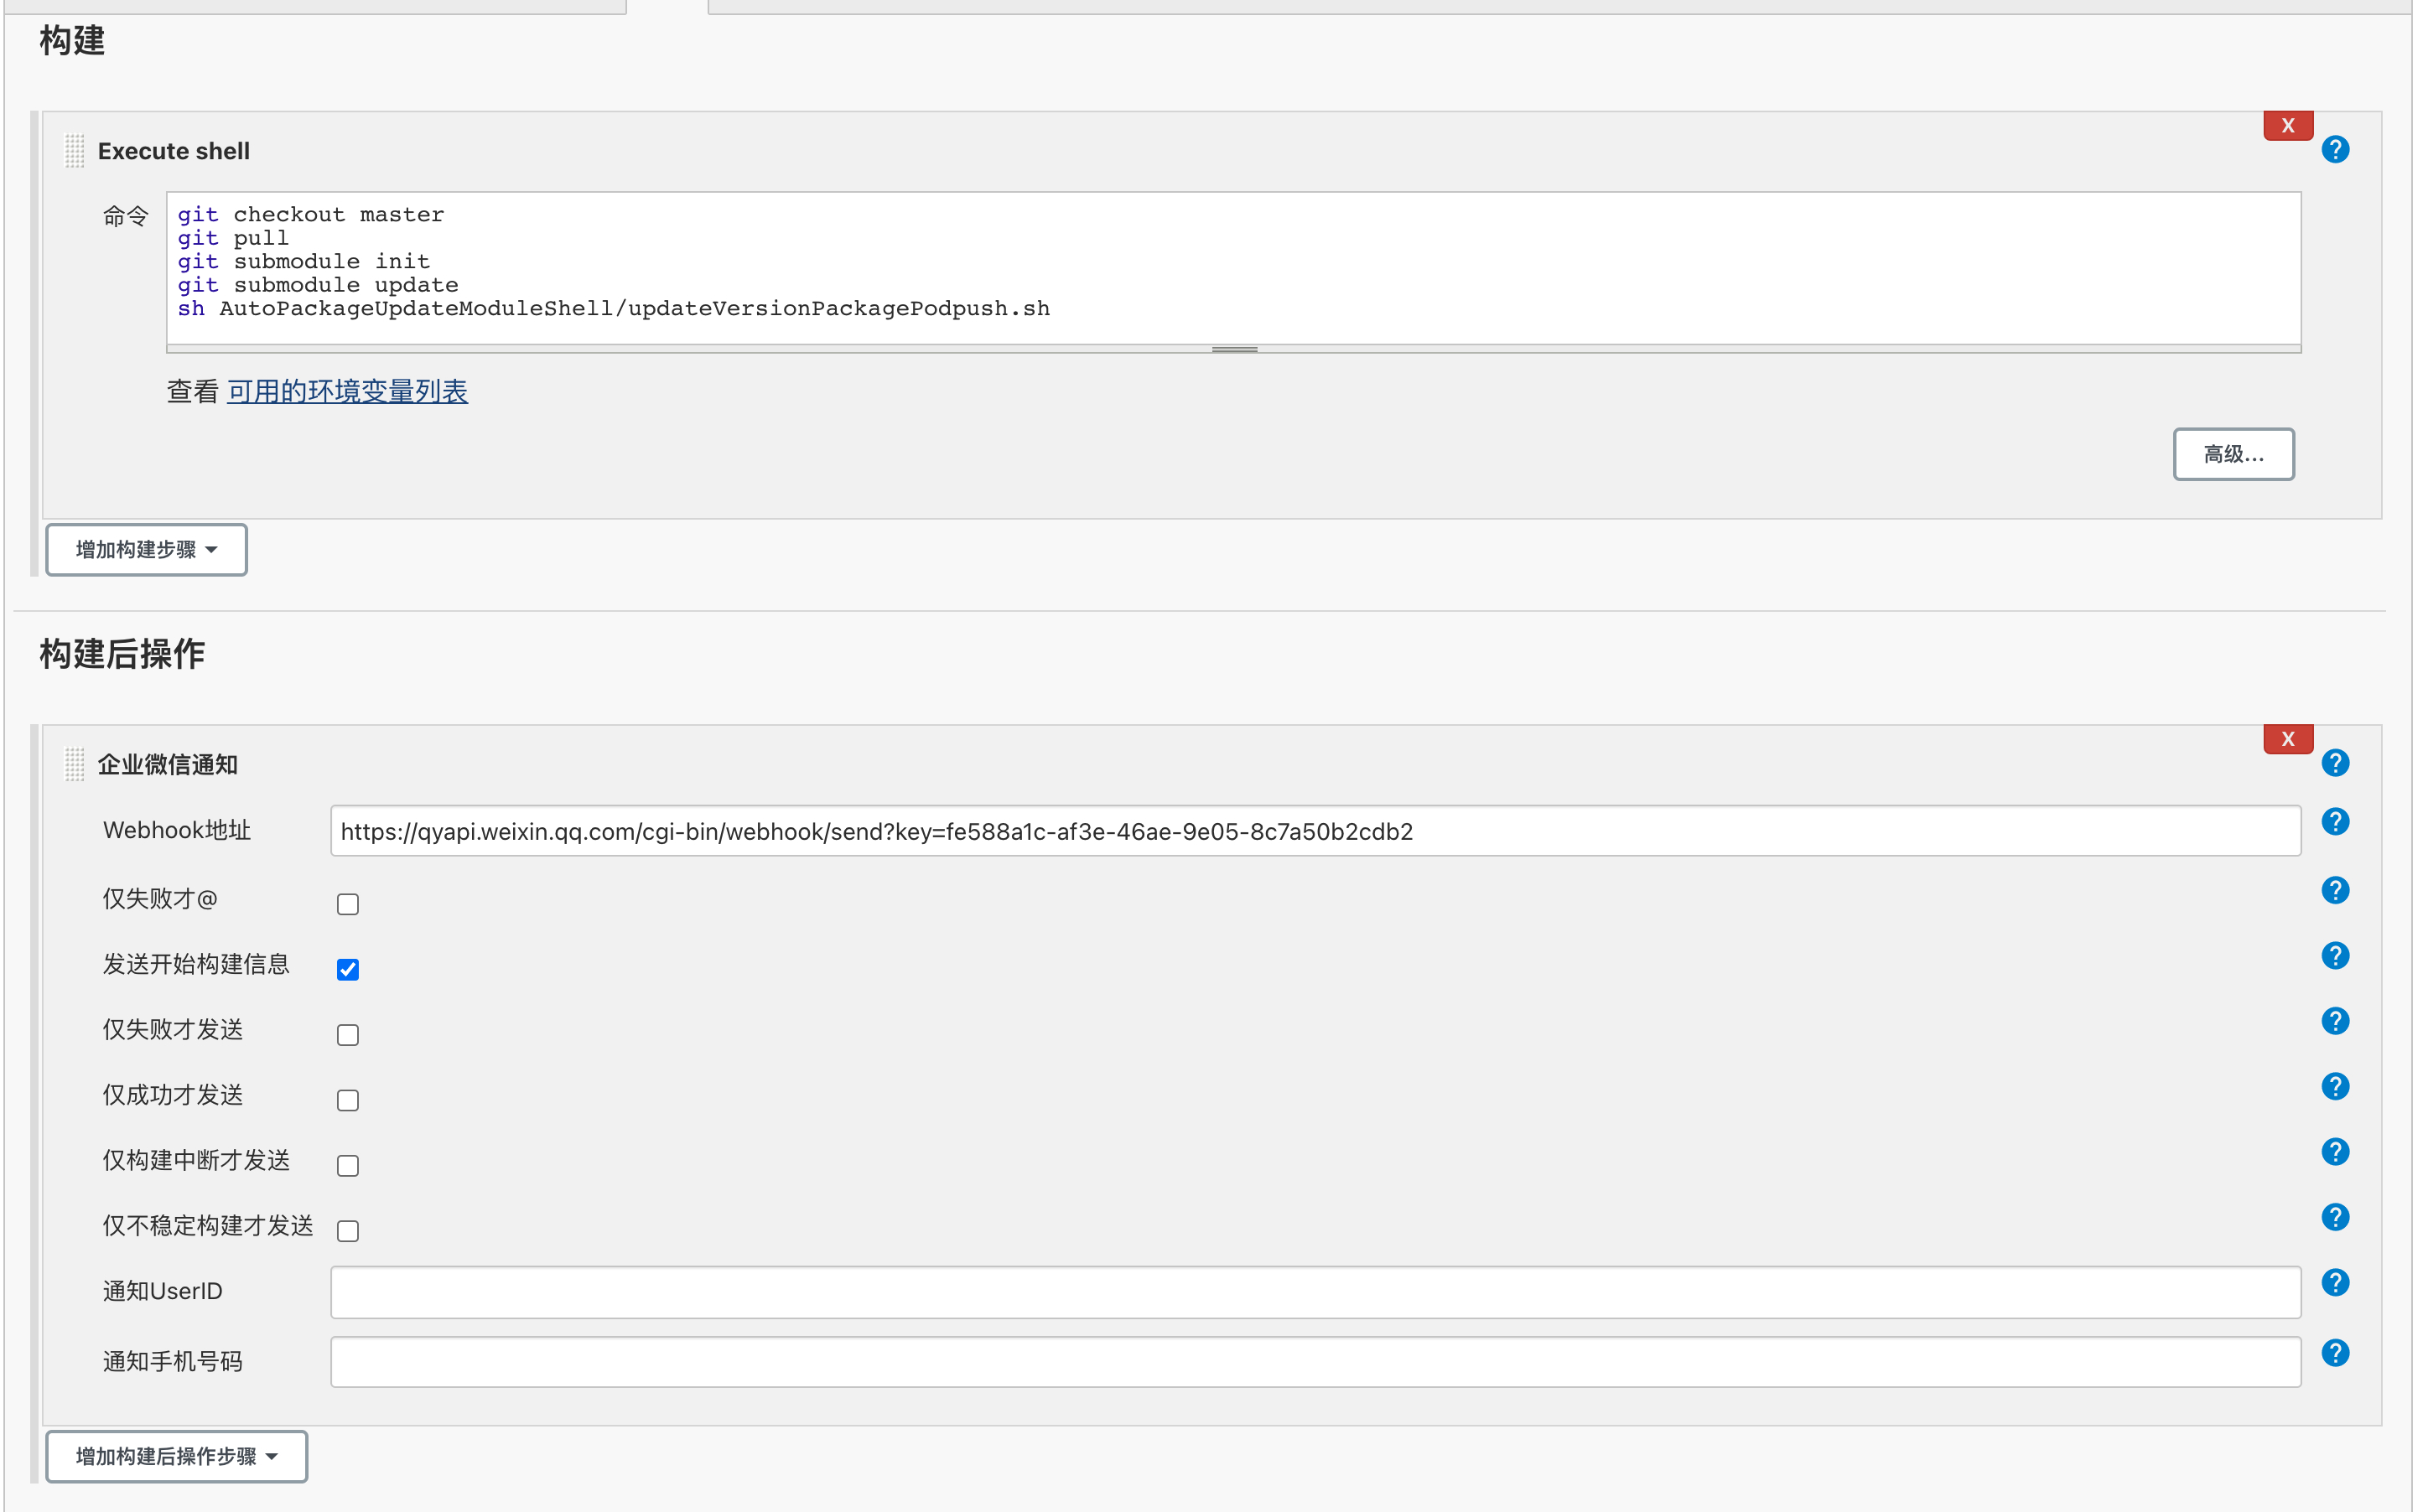
    但是我们现有的模块比较多,如果都在自己电脑上做升级打包,要手动打包、上传还要时刻盯着结果。那就在服务器上部署个jenkins来完成打包的任务,打包压缩完成之后借助nginx托管。

    jenkins配置上gitee仓库的webhook。

    jenkins配置如下

    jenkins配置

    自动更新版本打包的脚本如下:

    1
    2
    3
    4
    5
    6
    7
    8
    9
    10
    11
    12
    13
    14
    15
    16
    17
    18
    19
    20
    21
    22
    23
    24
    25
    26
    27
    28
    29
    30
    31
    32
    33
    34
    35
    36
    37
    38
    39
    40
    41
    42
    43
    44
    45
    46
    47
    48
    49
    50
    51
    52
    53
    54
    55
    56
    57
    58
    59
    60
    61
    62
    63
    64
    65
    66
    67
    68
    69
    70
    71
    72
    73
    74
    75
    76
    77
    78
    79
    80
    81
    82
    83
    84
    85
    86
    87
    88
    89
    90
    91
    92
    93
    94
    95
    96
    97
    98
    99
    100
    101
    102
    103
    104
    105
    106
    107
    108
    109
    110
    111
    112
    113
    114
    115
    116
    117
    118
    119
    120
    121
    122
    123
    124
    125
    126
    127
    128
    129
    130
    131
    132
    133
    134
    135
    136
    137
    138
    139
    140
    141
    142
    143
    144
    145
    146
    147
    148
    149
    150
    151
    152
    153
    154
    155
    156
    157
    158
    159
    160
    161
    162
    163
    164
    165
    166
    167
    168
    169
    170
    171
    172
    173
    174
    175
    176
    177
    178
    179
    180
    181
    182
    183
    184
    185
    186
    187
    188
    189
    190
    191
    192
    193
    194
    #自动打包frameWork并推送pod repo的脚本。可指定版本号,不指定版本号按照版本号自增1的规则更新。
    #流程如下:
    #更新代码
    #更改[moduleName]Package.podspec 版本号
    #执行打包命令
    #修改[moudule].podspec 版本号
    #git add、commit、push
    #git tag 、 git push --tags
    #执行更新命令xx

    #当前文件路径
    directory="$(pwd)"
    #当前模块名称
    mouduleName=${directory##*/}
    echo "当前模块名称 ${mouduleName}"

    #版本号递增函数
    increment_version ()
    {
    declare -a part=( ${1//\./ } )
    declare new
    declare -i carry=1
    CNTR=${#part[@]}-1
    len=${#part[CNTR]}
    new=$((part[CNTR]+carry))
    part[CNTR]=${new}
    new="${part[*]}"
    echo "${new// /.}"
    return ${new// /.}
    }

    echo "当前分支"
    git branch
    echo "更新当前分支代码"
    git pull origin
    echo "更新当前分支代码完成"

    #read -p "输入需要发布的版本号,按Enter默认版本最小位+1: " shouldToVersion
    #echo "输入版本号为:${shouldToVersion}"

    #read -p "输入tag的注释(当前版本更新内容),按Enter表示不需要tag注释: " tagComment
    #echo "输入版本更新内容:${tagComment}"

    shouldToVersion=""
    tagComment=""

    echo "获取podspec文件 begin"
    #podspec文件路径
    packagePodspec_file_path="../${mouduleName}Package.podspec"
    podpushPodspec_file_path="../${mouduleName}.podspec"
    packagePodspec_file_name="${mouduleName}Package.podspec"
    podpushPodspec_file_name="${mouduleName}.podspec"
    echo "packagePodspec_file_path: ${packagePodspec_file_path}"
    echo "podpushPodspec_file_path: ${podpushPodspec_file_path}"
    echo "获取podspec文件 end"

    echo "读取podspec文件内容 begin"
    # 定义pod文件名称
    pod_file_name=${packagePodspec_file_name}
    # 查找 podspec 的版本
    search_str="s.version"
    # 当前版本号
    currentVersion=""
    #版本号所在行内容
    versionLine=""
    while read line
    do
    #查找包含的内容,正则表达式以search_str开头的内容
    result=$(echo ${line} | grep "^${search_str}")
    if [ "$result" != "" ]
    then
    echo " ${line} 包含 ${search_str}"
    versionLine=${line}
    currentVersion=${result##* }
    #去掉双引号
    currentVersion=${currentVersion:1:${#currentVersion}-1}
    currentVersion=${currentVersion:0:${#currentVersion}-1}
    fi
    done < $pod_file_name

    echo "当前版本号: ${currentVersion}"
    if [ currentVersion == "" ]
    then
    echo "获取当前版本号错误"
    set -e
    exit 1
    fi

    if [ "$shouldToVersion" == "" ]
    then
    shouldToVersion=$(increment_version ${currentVersion})
    #shouldToVersion=${currentVersion}
    fi

    echo "更新版本号为:$shouldToVersion"
    updateVersionLine="s.version = \"${shouldToVersion}\""

    echo "修改packagePodspec版本号 begin"
    sed -i "" "s/${versionLine}/${updateVersionLine}/g" ${packagePodspec_file_name}
    echo "修改packagePodspec版本号 end"

    echo "打包 begin"
    sh package.sh
    if [ ! -d "${mouduleName}-$shouldToVersion/${mouduleName}.xcframework" ] && [ ! -d "${mouduleName}-${shouldToVersion}/ios/${mouduleName}.embeddedframework" ]
    then
    echo "打包失败"
    set -e
    exit 1
    fi
    echo "打包 end"

    #echo "删除build文件夹"
    #rm -rf "${mouduleName}-$shouldToVersion/build"

    zipVersion=${shouldToVersion//./_}
    zipName="${mouduleName}_v${zipVersion}"

    rm -rf ${zipName}/
    rm -f ${zipName}.zip
    mkdir ${zipName}

    mkdir ${zipName}/frameworks
    mkdir ${zipName}/libs

    echo " 创建压缩包"

    if [ -d "${mouduleName}-$shouldToVersion/${mouduleName}.xcframework" ]
    then
    echo "cocoapods-xcframework打包方式"

    cp -a -f ${mouduleName}-${shouldToVersion}/${mouduleName}.xcframework/ios-armv7_arm64/ ${zipName}/frameworks/
    # macmini not work , user find command
    # cp -rf ${mouduleName}/Core/Vendor/**/*.framework ${zipName}/frameworks/
    # cp -rf ${mouduleName}/Core/Vendor/**/*.a ${zipName}/libs/
    # cp -rf EMPASR/Resources/**/*.{bundle,dat,bin,caf} ${zipName}/
    find ${mouduleName}/Resources/ -name '*.bundle' -o -name '*.dat' -o -name '*.bin' -o -name '*.caf' -o -name '*.xml' -o -name '*.js' -o -name '*.plist' | xargs -I F cp -rf "F" ${zipName}/
    # 第三方库资源文件
    find ${mouduleName}/Core/Vendor -name '*.bundle' -o -name '*.dat' -o -name '*.bin' -o -name '*.caf' -o -name '*.xml' -o -name '*.js' -o -name '*.plist' | xargs -I F cp -rf "F" ${zipName}/
    else
    echo "cocoapods-packer打包方式"

    cp -a -f ${mouduleName}-${shouldToVersion}/ios/${mouduleName}.embeddedframework/*.framework ${zipName}/frameworks/
    #find ${mouduleName}/Resources/ -name '*.bundle' -o -name '*.dat' -o -name '*.bin' -o -name '*.caf' -o -name '*.xml' | xargs -I F cp -rf "F" ${zipName}/
    # 第三方库资源文件
    #find ${mouduleName}/Core/Vendor -name '*.bundle' -o -name '*.dat' -o -name '*.bin' -o -name '*.caf' -o -name '*.xml' -o -name '*.js' -o -name '*.plist' | xargs -I F cp -rf "F" ${zipName}/
    fi

    echo "导入依赖的第三方库"
    find ${mouduleName}/Core/Vendor/ -name '*.framework' | xargs -I F cp -rf "F" ${zipName}/frameworks/
    find ${mouduleName}/Core/Vendor/ -name '*.a' | xargs -I F cp -rf "F" ${zipName}/libs/

    zip -y -r ${zipName}.zip ${zipName}

    echo "上传压缩包"
    #sshpass -p 'cccc' ssh xiaofeixia@192.168.50.197
    #sshpass -p 'cccc' scp ${zipName}.zip xiaofeixia@192.168.50.197:/Users/xiaofeixia/ios_frameworks/${mouduleName}

    if [ ! -d "/Users/mac/Desktop/iOS/ios-frameworks/${mouduleName}" ]
    then
    mkdir /Users/mac/Desktop/iOS/ios-frameworks/${mouduleName}
    echo "创建模块文件夹"
    fi

    cp ${zipName}.zip /Users/mac/Desktop/iOS/ios-frameworks/${mouduleName}

    echo "删除包文件"
    rm -rf ${mouduleName}-${shouldToVersion}
    rm -rf ${zipName}/
    rm -f ${zipName}.zip

    echo "修改podspec版本号 begin"
    sed -i "" "s/${versionLine}/${updateVersionLine}/g" ${podpushPodspec_file_name}
    echo "修改podspec版本号 end"

    echo "git push"
    git add ${packagePodspec_file_name} ${podpushPodspec_file_name}
    git commit -m "version to $shouldToVersion"
    git push origin HEAD:master

    echo "git tag"
    git tag -f $shouldToVersion -m "$tagComment"
    git push origin -f $shouldToVersion

    echo "pod push"
    if ! sh podpush.sh; then
    echo "pod install错误"
    set -e
    exit 1
    fi

    echo "更新pod私有库"
    cd /Users/mac/.cocoapods/repos/EMPPrivateSpecs
    git pull

    三、总结

    本文章只是提供了iOS模块产物化、自动升级托管的一个大致流程及思路。具体实现细节视个人项目而定。

cherry-pick 一次merge的提交提示:

1
Commit 140657867ed34483b9ce44959b8ae4c6a7b329b6 is a merge but no -m option was given.

原因:如果原始提交是一个合并节点,来自于两个分支的合并,那么 Cherry pick 默认将失败,因为它不知道应该采用哪个分支的代码变动。

-m配置项告诉 Git,应该采用哪个分支的变动。它的参数parent-number是一个从1开始的整数,代表原始提交的父分支编号。

1
-m parent-number--mainline parent-number
1
$ git cherry-pick -m 1 <commitHash>

上面命令表示,Cherry pick 采用提交commitHash来自编号1的父分支的变动。

一般来说,2号父分支是接受变动的分支(the branch being merged into),1号父分支是作为变动来源的分支(the branch being merged from)。

参数传入当前页面的导航栏控制器或 self.window.rootViewController 。

1
2
3
4
5
6
7
8
9
10
11
12
13
14
15
+ (UIViewController *)topViewControllerWithRootViewController:(UIViewController*)rootViewController
{
if ([rootViewController isKindOfClass:[UITabBarController class]]) {
UITabBarController *tabBarController = (UITabBarController *)rootViewController;
return [self topViewControllerWithRootViewController:tabBarController.selectedViewController];
} else if ([rootViewController isKindOfClass:[UINavigationController class]]) {
UINavigationController* navigationController = (UINavigationController*)rootViewController;
return [self topViewControllerWithRootViewController:navigationController.visibleViewController];
} else if (rootViewController.presentedViewController) {
UIViewController* presentedViewController = rootViewController.presentedViewController;
return [self topViewControllerWithRootViewController:presentedViewController];
} else {
return rootViewController;
}
}

网络上的很多得到农历的年份都是错误的。再次更正一下:

关于农历的年份

六十甲子又称六十花甲子,是汉族人民最早、最大的发明创造,其最古老的用途是纪年、纪月、纪日、纪时。纪年为60年一个周期,纪月为5年一个周期,纪日为60天一个周期,纪时为5天一个周期。

以天干和地支按顺序相配﹐即甲、乙、丙、丁、戊、己、庚、辛、壬、癸与子、丑、寅、卯、辰、巳、午、未、申、酉、戌、亥相组合,从”甲子”起﹐到”癸亥”止﹐满六十为一周﹐称为”六十甲子”。亦称”六十花甲子”。 又因起头是“甲”字的有六组,所以也叫“六甲”。

关于12生肖

十二生肖是十二地支的形象化代表,即子(鼠)、丑(牛)、寅(虎)、卯(兔)、辰(龙)、巳(蛇)、午(马)、未(羊)、申(猴)、酉(鸡)、戌(狗)、亥(猪),随着历史的发展逐渐融合到相生相克的民间信仰观念,表现在婚姻、人生、年运等,每一种生肖都有丰富的传说,并以此形成一种观念阐释系统,成为民间文化中的形象哲学,如婚配上的属相、庙会祈祷、本命年等。现代,更多人把生肖作为春节的吉祥物,成为娱乐文化活动的象征。

农历的年份 (生肖) 例如:甲子(鼠)年

1
2
3
4
5
6
7
8
9
10
11
12
13
14
15
16
17
18
19
20
21
22
23
24
25
26
27
28
29
30
31
32
33
34
35
36
37
38
39
40
41
42
43
44
45
46
47
+ (NSString *)getChineseYearWithDate:(NSDate *)date{
NSArray *chineseYears = [NSArray arrayWithObjects:
@"甲子", @"乙丑", @"丙寅", @"丁卯", @"戊辰", @"己巳", @"庚午", @"辛未", @"壬申", @"癸酉",
@"甲戌", @"乙亥", @"丙子", @"丁丑", @"戊寅", @"己卯", @"庚辰", @"辛巳", @"壬午", @"癸未",
@"甲申", @"乙酉", @"丙戌", @"丁亥", @"戊子", @"己丑", @"庚寅", @"辛卯", @"壬辰", @"癸巳",
@"甲午", @"乙未", @"丙申", @"丁酉", @"戊戌", @"己亥", @"庚子", @"辛丑", @"壬寅", @"癸卯",
@"甲辰", @"乙巳", @"丙午", @"丁未", @"戊申", @"己酉", @"庚戌", @"辛亥", @"壬子", @"癸丑",
@"甲寅", @"乙卯", @"丙辰", @"丁巳", @"戊午", @"己未", @"庚申", @"辛酉", @"壬戌", @"癸亥", nil];

NSCalendar *localeCalendar = [[NSCalendar alloc] initWithCalendarIdentifier:NSCalendarIdentifierChinese];

unsigned unitFlags = NSCalendarUnitYear | NSCalendarUnitMonth | NSCalendarUnitDay;

NSDateComponents *localeComp = [localeCalendar components:unitFlags fromDate:date];


NSString *y_str = [chineseYears objectAtIndex:localeComp.year - 1];

NSString *Cz_str = nil;
if ([y_str hasSuffix:@"子"]) {
Cz_str = @"鼠";
}else if ([y_str hasSuffix:@"丑"]){
Cz_str = @"牛";
}else if ([y_str hasSuffix:@"寅"]){
Cz_str = @"虎";
}else if ([y_str hasSuffix:@"卯"]){
Cz_str = @"兔";
}else if ([y_str hasSuffix:@"辰"]){
Cz_str = @"龙";
}else if ([y_str hasSuffix:@"巳"]){
Cz_str = @"蛇";
}else if ([y_str hasSuffix:@"午"]){
Cz_str = @"马";
}else if ([y_str hasSuffix:@"未"]){
Cz_str = @"羊";
}else if ([y_str hasSuffix:@"申"]){
Cz_str = @"猴";
}else if ([y_str hasSuffix:@"酉"]){
Cz_str = @"鸡";
}else if ([y_str hasSuffix:@"戌"]){
Cz_str = @"狗";
}else if ([y_str hasSuffix:@"亥"]){
Cz_str = @"猪";
}

return [NSString stringWithFormat:@"%@(%@)年",y_str,Cz_str];
}

农历的月、日

1
2
3
4
5
6
7
8
9
10
11
12
13
14
15
16
17
18
19
20
21
22
23
24
25
+ (NSString *)getChineseCalendarWithDate:(NSDate *)date{
NSArray *chineseMonths=[NSArray arrayWithObjects:
@"正月", @"二月", @"三月", @"四月", @"五月", @"六月", @"七月", @"八月",
@"九月", @"十月", @"冬月", @"腊月", nil];

NSArray *chineseDays=[NSArray arrayWithObjects:
@"初一", @"初二", @"初三", @"初四", @"初五", @"初六", @"初七", @"初八", @"初九", @"初十",
@"十一", @"十二", @"十三", @"十四", @"十五", @"十六", @"十七", @"十八", @"十九", @"二十",
@"廿一", @"廿二", @"廿三", @"廿四", @"廿五", @"廿六", @"廿七", @"廿八", @"廿九", @"三十", nil];


NSCalendar *localeCalendar = [[NSCalendar alloc] initWithCalendarIdentifier:NSCalendarIdentifierChinese];

unsigned unitFlags = NSCalendarUnitYear | NSCalendarUnitMonth | NSCalendarUnitDay;

NSDateComponents *localeComp = [localeCalendar components:unitFlags fromDate:date];

NSString *m_str = [chineseMonths objectAtIndex:localeComp.month-1];

NSString *d_str = [chineseDays objectAtIndex:localeComp.day-1];

NSString *chineseCal_str =[NSString stringWithFormat: @"%@%@",m_str,d_str];

return chineseCal_str;
}

今天是周几?

1
2
3
4
5
6
7
8
9
10
11
12
13
14
15
16
17
18
19
20
21
22
23
24
25
+ (NSString *)getWeekDayWithDate:(NSDate *)date{
//只适用于iOS8
NSCalendar *greCalendar = [[NSCalendar alloc] initWithCalendarIdentifier:NSCalendarIdentifierGregorian];
// 通过已定义的日历对象,获取某个时间点的NSDateComponents表示,并设置需要表示哪些信息(NSYearCalendarUnit, NSMonthCalendarUnit, NSDayCalendarUnit等)

NSDateComponents *dateComponents = [greCalendar components:NSCalendarUnitWeekday fromDate:date];
NSString *str = [NSString stringWithFormat:@"%li",(long)dateComponents.weekday];

if ([str isEqual: @"1"]) {
return @"周日";
}else if ([str isEqual:@"2"]){
return @"周一";
}else if ([str isEqual:@"3"]){
return @"周二";
}else if ([str isEqual:@"4"]){
return @"周三";
}else if ([str isEqual:@"5"]){
return @"周四";
}else if ([str isEqual:@"6"]){
return @"周五";
}else{
return @"周六";
}

}

本年或者本月的第几周 第一个参数传YES 得到本年的第几周 NO为本月的第几周。

1
2
3
4
5
6
7
8
9
10
11
12
+ (NSString *)getWeekInyearOrMouth:(BOOL)inYear WithDate:(NSDate *)date{
NSCalendar *greCalendar = [[NSCalendar alloc] initWithCalendarIdentifier:NSCalendarIdentifierGregorian];
// 通过已定义的日历对象,获取某个时间点的NSDateComponents表示,并设置需要表示哪些信息(NSYearCalendarUnit, NSMonthCalendarUnit, NSDayCalendarUnit等)

NSDateComponents *dateComponents = [greCalendar components:NSCalendarUnitWeekOfYear | NSCalendarUnitWeekOfMonth fromDate:date];
if (inYear) {
return [NSString stringWithFormat:@"第%li周",(long)dateComponents.weekOfYear];
}else{
return [NSString stringWithFormat:@"第%li周",(long)dateComponents.weekOfMonth];
}

}

1、添加代理 UINavigationControllerDelegate

1
2
3
4
5
6
7
8
9
10
11
12
13
- (void)viewWillAppear:(BOOL)animated{
[super viewWillAppear:animated];
[self.navigationController.navigationBar setHidden:YES];
if ([[[UIDevice currentDevice] systemVersion] floatValue] > 7.0) {
self.navigationController.delegate = self;
}
}

- (void)viewWillDisappear:(BOOL)animated{
if ([[[UIDevice currentDevice] systemVersion] floatValue] > 7.0) {
self.navigationController.delegate = nil;
}
}

2、实现代理方法

1
2
3
4
5
6
7
//监听滑动手势
- (void)navigationController:(UINavigationController *)navigationController willShowViewController:(UIViewController *)viewController animated:(BOOL)animated{
id <UIViewControllerTransitionCoordinator>tc = navigationController.topViewController.transitionCoordinator;
[tc notifyWhenInteractionChangesUsingBlock:^(id<UIViewControllerTransitionCoordinatorContext> _Nonnull context) {
[dataKit kit].reloadFlage = [context isCancelled];
}];
}

[context isCancelled] 是BOOL类型,未返回[context isCancelled]==YES,返回成功[context isCancelled]==NO。

点击按钮返回 或使用 [navigationController popviewcontorller] 不进入此回调。

为了缩短开发周期。我们尝试使用 用webview 加载html页面的方式,实现安卓、iOS开发的同步进行。

UIWebview 存在内存泄露问题,iOS8以后,苹果推出了新框架Webkit,提供了替换UIWebView的组件WKWebView。

WKWebView 在内存占用上优化的很多。但是在实践中发现bug:localstorage信息不一致。
场景:A页面和B页面都存在 一个WKWebView。 在B页面使用localstorage保存信息。 回到A页面取不到最新的数据。

原因:

wkwebviewconfiguration 中有个属性 processPool,描述是:The process pool from which to obtain the view’s Web Content process.

解决方法:

把config中的processPool变为单例共享

1
2
3
4
5
6
7
8
9
10
11
12
WKWebViewConfiguration *wkConfig = [[WKWebViewConfiguration alloc] init];
//使用单例 解决locastorge 储存问题
wkConfig.processPool = [hrWkWebViewController singleWkProcessPool];

_wkWebView = [[WKWebView alloc] initWithFrame:CGRectZero configuration:wkConfig];

+ (WKProcessPool *)singleWkProcessPool{
AFDISPATCH_ONCE_BLOCK(^{
sharedPool = [[WKProcessPool alloc] init];
})
return sharedPool;
}

cornerstone 修改 preferences中忽略项目不起作用请直接看4、(假装有超链接)。

XCode工程中有个文件夹xuserdata,这个铁头娃文件更新非常频繁,每次commit都有他。眼不见心不烦我们可以设置在提交的时候忽略这个文件。

此文件中存放内容:

1.Xcode默认会记住我们当前正在编辑的文件,也就是上次退出项目时停留的文件,下次打开项目会停留在该文件。我们不需要把这些信息共享给同事,所以需要忽略。
2.Xcode会记录目录的打开情况。同事不需要共享。
3.断点信息。同事不需要共享。
以上三个需要忽略的信息,都在xcuserdata 文件夹下,所以只需要忽略xcuserdata文件夹。

1、设置 cornerstone的全局忽略文件:

cornerstone -> preferences -> subversion

1、取消勾选 use default global ignores。

2、然后编辑忽略文件。

3、点击save。

设置需要忽略的文件

2、忽略指定文件/文件夹

选中右键选择 Ignore

忽略指定文件/文件夹

忽略成功后

image

3、取消忽略

删除上图中的忽略项目 点击保存

4、有些同学发现在preferences中设置后 没什么卵用。文件夹还是会显示在上面。 右键选中指定文件之后Igonre却是灰色的。

是因为:

Cornerstone can only ignore unversioned files. Once a file has been added to a working copy it can no longer be ignored.

已经添加working copy的文件是不能被忽略的。working-copies

解决方法:

1、备份文件

2、删除文件

3、提交

4、把备份文件重新放入原地址(如果在preferences中设置了忽略文件,此文件不会显示在工作空间中)